If you love smoking herbs or tobacco, but you don’t have a pipe or a bong handy, don’t worry. You can make your own bong at home using some cheap and basic supplies. A homemade bong is not only easy to make, but also fun and creative. You can customize it to your liking and enjoy a smooth and satisfying smoking experience. In this blog post, we will show you how to make a homemade bong in 12 simple steps.
What You Will Need
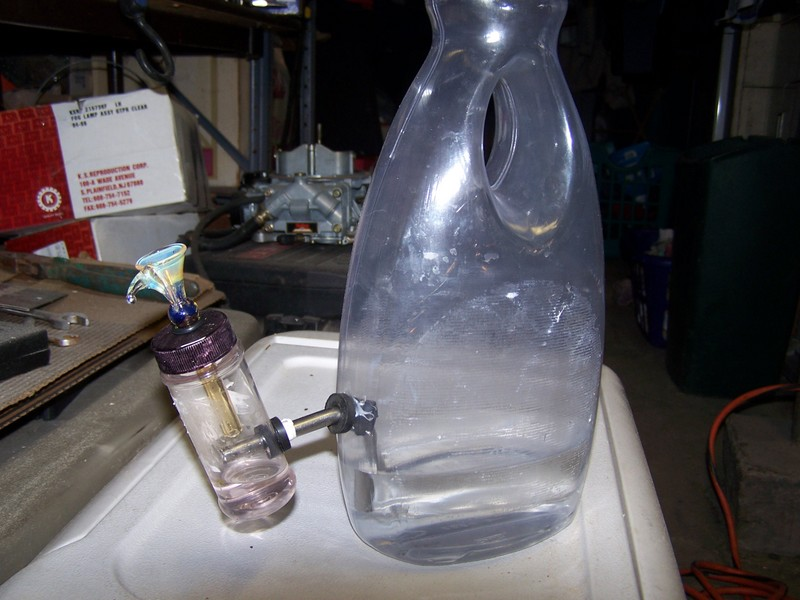
To make a homemade bong, you will need the following items:
- A plastic bottle of any size. The larger the bottle, the bigger the bong hits will be.
- A pen with the ink removed. You will use this as a downstem to connect the bowl to the bottle.
- A piece of aluminum foil. You will use this to make the bowl where you will pack your herbs or tobacco.
- A sharp tool, such as a knife, scissors, or a straightened out paperclip. You will use this to make holes in the bottle and the foil.
- Water. You will fill the bottle with water to filter the smoke.
Step 1: Fill the Bottle with Water
The first step is to fill the bottle with water up to about one-fourth of its capacity. The water will act as a filter and cool down the smoke as you inhale it. You don’t need to have the cap of the bottle for this project, so you can discard it or save it for later use.
Step 2: Make the Carb
The carb is the hole that you will cover with your finger when you smoke and release when you want to clear the bong. To make the carb, poke a hole just below the neck of the bottle with your sharp tool. Make sure the hole is large enough for air to flow through it easily, but not so big that you can’t cover it with your finger.
Step 3: Make the Downstem Hole
The downstem is the tube that connects the bowl to the water in the bottle. To make the downstem hole, poke another hole slightly above the waterline on the side of the bottle with your sharp tool. Make sure the hole is about the same width as your pen tube. If it’s too small, you may have trouble inserting the downstem, and if it’s too large, the downstem may be too loose and let air escape.
Step 4: Make the Downstem
To make the downstem, take your pen tube and remove any ink or plastic parts from it. You should be left with a hollow plastic tube that can fit through the downstem hole. Then, take a small piece of aluminum foil and wrap it around one end of the tube. Press the center of the foil down into the tube to form a bowl shape. Poke some tiny holes in the foil with your sharp tool so that smoke can pass through it.
Step 5: Insert the Downstem
To insert the downstem, push the open end of the tube through the downstem hole at an angle so that it goes into the water. The foil bowl should be facing upwards on the outside of the bottle. Adjust the angle and length of the downstem until you are satisfied with how it fits.
Step 6: Pack the Bowl
To pack the bowl, grind up some herbs or tobacco and place them on top of the foil bowl. Don’t pack it too tightly or too loosely, as this may affect how well it burns and how much smoke you get.
Step 7: Light Up and Enjoy
To use your homemade bong, place your mouth over the mouthpiece of the bottle and cover the carb with your finger. Light up your herbs or tobacco with a lighter and inhale slowly through your mouth. You should see smoke bubbling through
the water and filling up
the bottle. When you are ready to clear
the bong, release
your finger from
the carb and inhale
the smoke quickly
and deeply into
your lungs.
Enjoy!
Tips and Tricks
Here are some tips and tricks to make your homemade bong even better:
- You can use different kinds of bottles for different effects. For example, you can use a two-liter bottle for huge bong hits, or a small water bottle for more discreet smoking.
- You can also use different kinds of fruits or vegetables as bowls instead of foil. For example, you can use an apple, a carrot, a bell pepper, or a strawberry. Just carve out a bowl shape in the fruit or vegetable and attach it to the pen tube. This can add some flavor and natural filtration to your smoke.
- You can experiment with different levels of water in the bottle to find your preferred filtration and drag. You can also add ice cubes, lemon juice, or other liquids to the water to enhance the flavor and smoothness of your smoke.
- You can decorate your homemade bong with stickers, paint, or other materials to make it more personalized and unique. Just make sure you don’t cover the holes or use anything that can melt or catch fire.
Conclusion
Making a homemade bong is a fun and easy way to enjoy your herbs or tobacco without spending a lot of money on a pipe or a bong. All you need is a plastic bottle, a pen tube, some foil, a sharp tool, and some water. Follow these 12 simple steps and you will have a fully functioning bong in no time. Happy smoking!